|
Great looking trees can be the bane of illustrators and architects alike. Photographic cutouts, simplistic clip art or time consuming renders never seem to match the look of the rendered building. Then again, most artists don't realize just how easy it is to paint realistic trees now.
It may sound too good to be true, but highly realistic trees can be painted in just a few minutes. That's because now you can actually paint with realistic foliage, limbs and branches, even in print size resolutions. All you need is Jungle DVD and a paint program.
It's about as easy as making a sandwich because you paint on three layers. You simply spray realistic foliage clusters onto a background layer, spray branches onto a trunk layer in the middle, then add foreground foliage to a top layer. If that sounds too simple, see for yourself.
Most any version of Painter will do, from 5 through 8. This tutorial is for the Painter 8 interface and can be used with the evaluation version of Painter. Use the Painter 6 & 7 tutorial for eariler versions. We've provided the tools (Mac) you'll need, including a finished tree and shadow texture.
Before you begin, use the Window pull down menu to show the Toolbox, Property and Brush Selector bars. Use Ctrl+4 to display the Layer palette and arrange them in a fashion similar to what is shown on the following page.
|
 |
|
|
1) Launch Painter and expand the File menu. Select New and enter 512 x 512 pixels to make the file dimensions square.
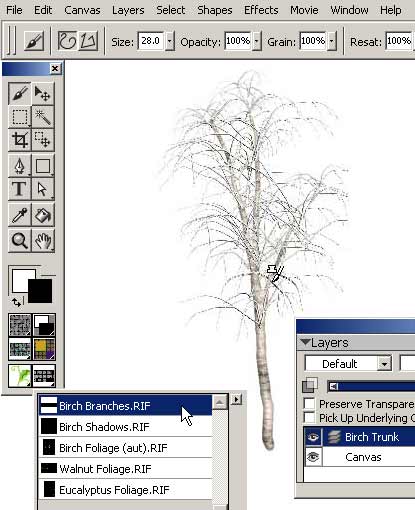
2) Open the "Birch Trunk" file found in your Jungle DVD tools and Click and drag the trunk layer into the working tree image, then close the Trunk file.
3) Choose the Import Library command on the Brush palette. Select the Tree Tutorial brush library included with the Jungle DVD tools, then select Load Library command.
4) Use the Nozzle Selector icon on the bottom right of the Tools Palette to display the nozzle menu as shown. Choose the Open Library command and select the "P_8 Nozzle Lib.NZL" library.
|
 |
|
|
5) Finally, choose the "Birch Branches" nozzle by clicking on the Nozzle Selector again.
6) To insure the branch size is set to the default 100%, choose Set Nozzle Scale and click OK.
7) Paint some branches along the trunk and limbs. Scale the brush size to paint smaller branches as you get near the top. Be sparing. A little goes a long way.
It's okay if the results are not perfect. The foliage will cover most errors. If you want to do a little touch-up, use the eraser or clone brushes to connect to the branches to the trunk correctly.
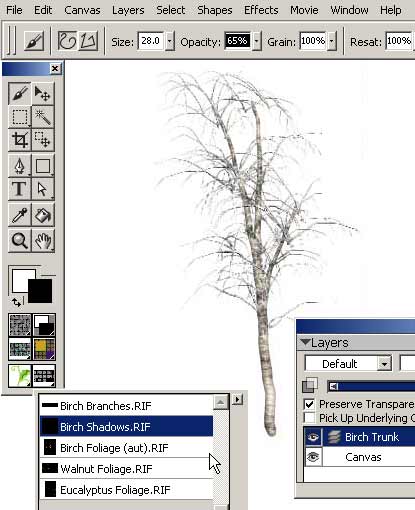
8) When you're finished painting branches, choose the "Birch Shadows" nozzle on the Nozzle Selector fly out list.
|
 |
|
|
9) Since shadows only apply to the trunk and limbs, select "Lock Transparency" on the Layers palette. That limits the paint to the visible part of the tree layer only.
10) Shadows are semi-transparent so be sure to set the nozzle Opacity to 65% on the Property Bar as demonstrated below.
11) If you don't have a tablet, use individual mouse clicks to paint with dabs. Make the shadows depict dappled lighting along the tree trunk and limbs.
|
 |
|
|
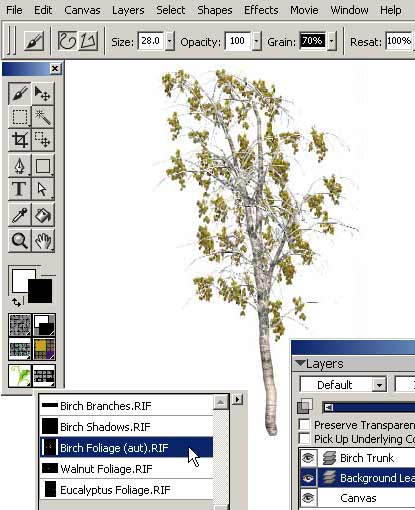
12) Turn off Lock Transparency and create a new Background Leaves layer. Position it below the trunk layer.
13) Select the "Birch Foliage (aut)" nozzle and set Nozzle Scale to 55% (or simply adjust the brush size to 15 on the Property Bar which has the same effect).
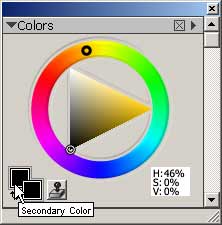
14) Open the Colors palette (Ctrl+1) and select the secondary color (see below). Choose a dark yellow or black as shown below.
15) Reduce brush Grain to 70% and return brush Opacity to 100%. Reducing the Grain setting will tint the foliage with the secondary color.
16) Paint some background leaves using dabs or individual mouse clicks. Be very sparing.
|
 |
|
|
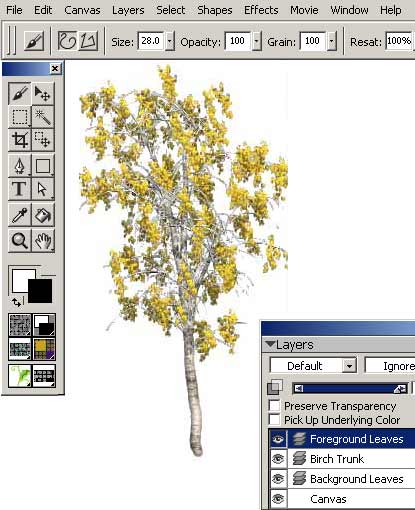
17) Now create a third Foreground Leaves layer and position it above the Trunk layer.
18) Reset Grain to 100%.
19) Using dabs, paint leaves on the front side of the tree. You want to see parts of the trunk and branches as well as the shaded leaves from the far side so be sparing.
20) When you're done painting, hold the Shift key down and select all three layers on the list. Group the layers using Ctrl+G, then Collapse the group to a single Birch Tree layer using the Layers menu.
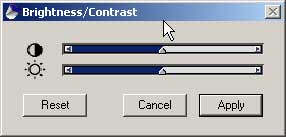
21) Use Brightness/Contrast to enhance the illusion of depth between the background and foreground leaves. Sharpening will bring the tree into clearer focus as well.
22) Both filters tend to increase Saturation, so use Adjust Color to lower Saturation. If the tree looks a bit too dark, increase the Value as well.
23) If you want to try adding a modeled or rounded look, choose Effects: Surface Control: Apply Lighting.
|
 |
|
|
24) All that's left is choose how to save the file, and that depends on how you plan to use the tree. If you plan to use it as 2D art, you're done. Simply save the tree layer as a Photoshop .psd file. Using the Photoshop format preserves the layer while letting you open the file in most any image editor.
25) If you plan to use the tree as a texture in 3D, you need to save an alpha channel mask of the tree before merging the layer with the Canvas background. Saving the alpha channel insures the tree will be the only part that is visible when the texture is mapped to a model in your 3D scene.
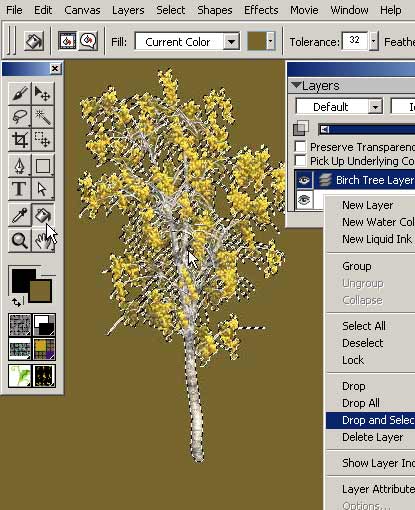
26) Use the Eye Dropper tool to sample the darker leaves on the tree, then Fill the Canvas background with that color. Filling the Canvas with the foliage color prevents a white halo from appearing around the tree when it's used as a texture.
27) Choose Drop and Select on the Layers menu or Layer fly out to merge the tree with the Canvas background.
28) Select the Save Selection command on the Select menu and click OK to save the selection as a new Alpha channel mask.
29) Save the flattened file using PSD or the file format preferred by your 3D application. (Painter 8 may not save alpha channels for TIF formats unless you tell it to, so be sure to select the "Save Alpha" checkbox or the mask will be lost.)
|
 |
|
|
30) A few last words.
If your first tree didn't turn out as well you would like, don't be discouraged. The tutorial is about getting familiar with the painting process and technique. It's hard to control everything the first time through, especially if you're new to Painter. Just repeat the tutorial until the sequence and commands become familiar. We've included different kinds of foliage to keep it interesting. Once you get the hang of it, you'll see how easy it is to paint highly realistic, dimensional looking trees and foliage. Great looking trees will soon follow.
This tutorial uses only the smallest versions of nozzles found in Jungle DVD. Larger nozzles translate to bigger trees, plants and foliage with greater detail and more striking results. You'll want to keep those.
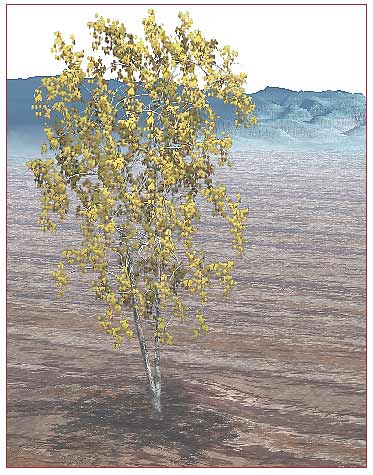
Try some of the other Jungle DVD tutorials as well. Painting Shadows demonstrates how to paint realistic shadow textures, as shown below the tree pictured here. Painting Structures demonstrates how to work with larger foliage structures, and how to paint trunks and limbs that match. Painting Terrains demonstrates techniques for creating dimensional looking foliage textures that map to irregular terrain models. Painting QTVR Panoramas shows you how to paint a QTVR panorama using Painter's tiling brush stroke effect.
To find out more about Jungle DVD and other DigArts products, visit us at https://www.gardenhose.com
|
|
|
|
©2000-2003, DigArts Software All Rights Reserved Worldwide. You are permitted to make one print copy of this tutorial. No part of this tutorial shall otherwise be reproduced or transmitted in any form including, but not limited to electronic, mechanical photocopying, recording or by any other means without prior written permission of DigArts Software. This document may not be used for fee based instruction without prior written permission of DigArts Software.
DigArts Software makes no warranty or representation with respect to this tutorial, the images, or the files including their quality or fitness for a particular purpose. The materials are provided on an "AS IS" basis. DigArts Software will not be liable for direct, indirect, special, incidental or consequential damages or costs arising out of the use or inability to use the tutorial or software included with the tutorial, even if advised of the possibility of such damages.
DigArtstm and Jungle 3Dtm are trademarks of DigArts Software. Paint Shop Protm is a trademark of Corel Corporation. Windowstm is a trademark of Microsoft Corp.
|
|